Products
Solutions
Resources
9977 N 90th Street, Suite 250 Scottsdale, AZ 85258 | 1-800-637-7496
© 2024 InEight, Inc. All Rights Reserved | Privacy Statement | Terms of Service | Cookie Policy | Do not sell/share my information

The Details section of the Header tab shows basic information about the contract
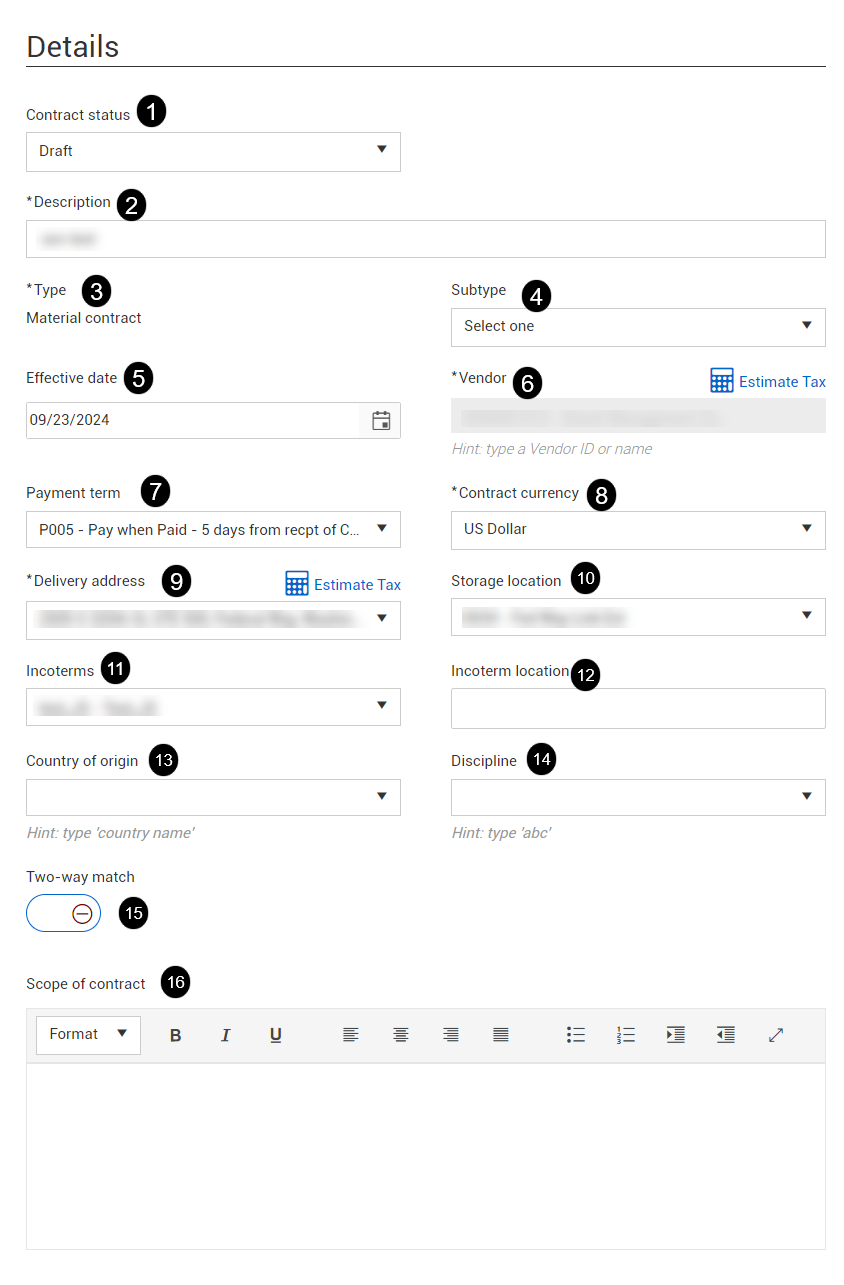
| Field/Section | Function | |
|---|---|---|
|
1 |
Contract status |
Drop-down of statuses you can change manually to track the progression of the contract. |
|
2 |
Description |
Free text entry; Brief overview of the contract which will display in reports. The description can be edited as needed. |
|
3 |
Type |
Drop-down denoting the kind of contract. Different contract types map to different PO types in ERP system. |
|
4 |
Subtype |
An additional drop-down to further categorize contract type. |
|
5 |
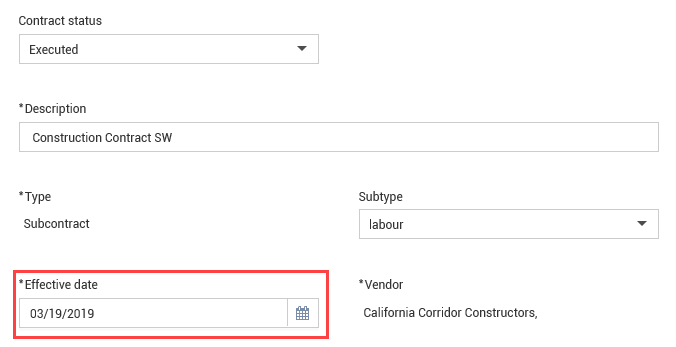
Effective date |
Beginning date of the contract, the date in which both parties have signed the agreement. |
|
6 |
Vendor |
Drop-down menu of all vendors set up in ERP system. You can click the Advanced vendor search icon at the bottom of the list to see the Select vendor dialog box that shows more vendor details and has its own search function. |
|
7 |
Payment term |
Drop-down menu to indicate terms of payment for the contract. Only payment terms marked as Available in the Master data library are shown in the drop-down menu. |
|
8 |
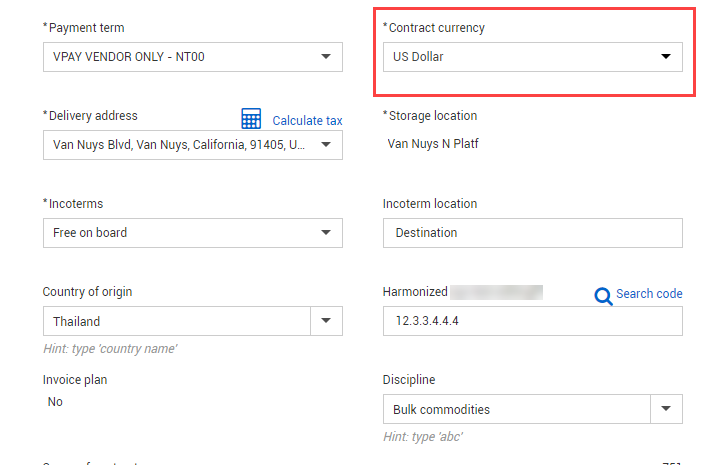
Contract currency |
Drop-down menu; currency in which the vendor will be paid. If there is no vendor or if the vendor does not have a currency assigned to their record in the master data library, the field has a drop-down menu, so you can select the contract currency. A warning icon is shown when the selected Contract currency does not have an exchange rate set up in the Project details, and a yellow warning banner shows at the top of the page. |
|
9 |
Delivery address |
Drop-down menu; Location where materials are delivered, or services are performed. Note: Delivery addresses can be added or modified in project settings with proper permissions. |
|
10 |
Storage location |
ERP entity for tracking materials within the ERP system. |
|
11 |
Incoterms |
International commercial terms that specify which party is responsible for material while in shipment to destination. Only Incoterms marked as Available in the Master data library are shown in the drop-down menu. |
|
12 |
Incoterm location |
Names the destination for Incoterms. |
|
13 |
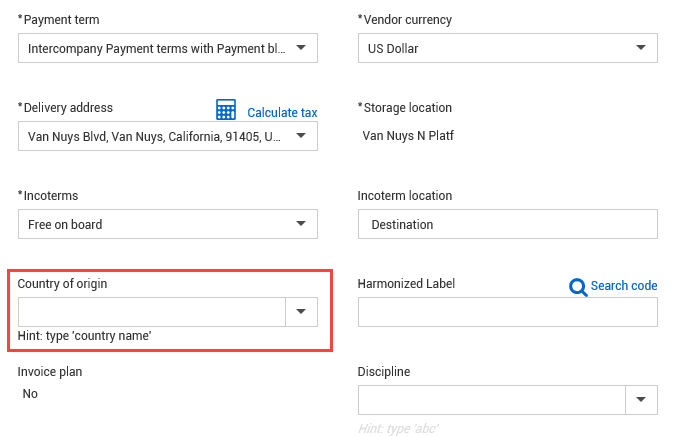
Country of origin |
The country where the project is being built. |
| 14 |
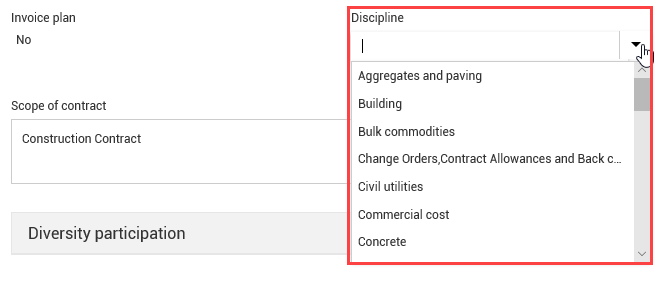
Discipline |
Drop-down menu to indicate the discipline category the contract falls under. |
|
15 |
Two-way match |
Allows for paying invoices without formal goods receipts; typically used for progress payments. |
|
16 |
Scope of contract |
Free text entry field to provide more information on the contract’s scope. You can use the Expand icon to expand the text box for easy text entry and viewing. You can then collapse the text box when you are finished. |
Following are additional details about the header tab.
The Contract status field is a drop-down that allows you to select the status of your contract.
The table below lists the status options available to select from.
| Field/Section | Function |
|---|---|
|
Draft |
The contract is still being created. |
|
In review |
Contract is following the workflow for approval. |
|
Out for vendor signature |
Contract is with the sub or vendor for signature. |
|
Out for internal signature |
Contract has been signed by vendor of subcontractor and is now routed for internal signatures. |
|
Executed |
Contract has been signed by both parties. |
|
Terminated |
Removed vendor or supplier off site. |
|
Cancelled |
Contract has been cancelled or never got executed. |
|
Closed |
Contract has been completed and closed out. |
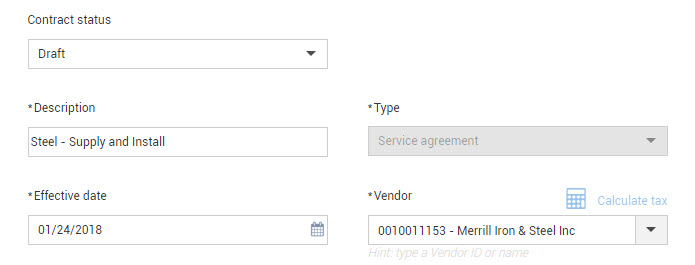
Description is a free text field where you can enter the information to describe what the contract is for (e.g., Steel – Supply and Install).
The contract type will already be populated from when the user added a new contract.
Created to further categorize contracts, subtypes which can be added to each contract type in your organization settings. Configure your organization settings by first creating a new subtype and then associate it to an existing contract type.

From the Organizational settings, select Contract > Contracts > Settings.
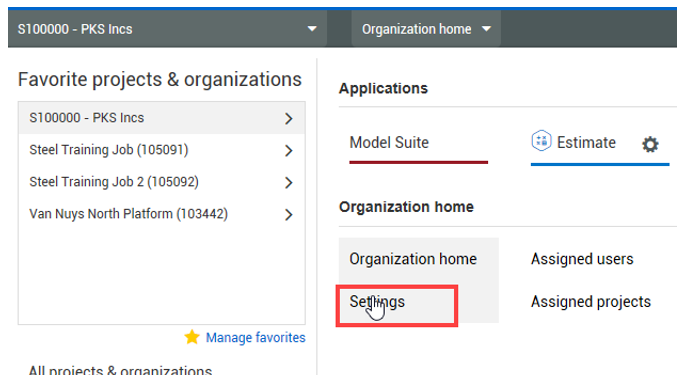
Go to Contract configurations, then select the settings icon under Contract type name.
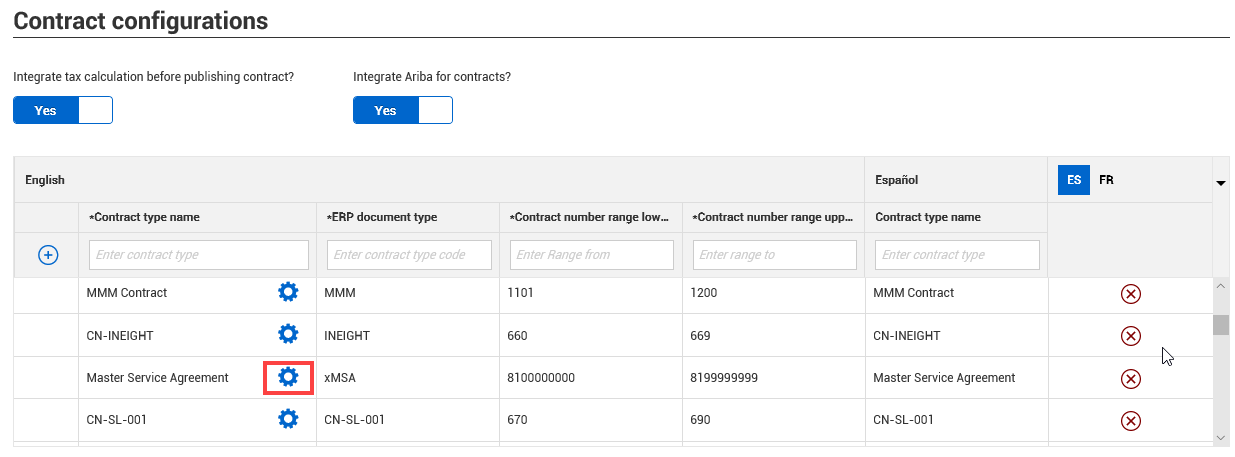
In the Subtype configurations slide out panel, select the subtypes tab.

To add a subtype, click in the new field under the Subtype name. Type in the name of your new subtype, then click on the Add icon to add to your list. Then click Save. The new subtype can now be added to any contract type.
The effective date is when your contract has been executed and becomes an official legal document.
The Vendor drop-down list shows all vendors that you have set up in the system. After they are added to your vendor database under Master data libraries, you can search for them by vendor number or by company name.
It is important to make sure you have the correct vendor tied to this contract as it will determine who gets paid from your ERP system. If you are using a schedule of values, and the Hide in plan and progress check box for a schedule item is not selected, changes made to the vendor on this page are automatically updated in InEight Plan.
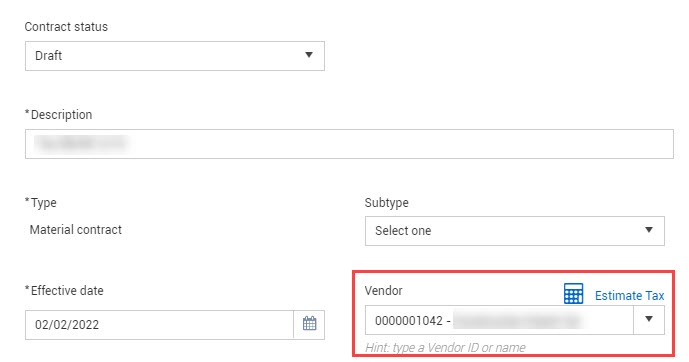
The Estimate Tax calculator for this field lets you estimate the tax for the contract line items. Prior to publishing a contract, if you click Estimate tax, taxes are calculated based on the tax types and their default percent listed in project settings. The estimated taxes are shown in the contract's line items and the contract totals. When the contract is published, tax information is updated from the Purchase order response.
Your payment terms are what you and the vendor or subcontractor agree on during contract negotiations. From the drop-down list, you can select from several different options that InEight Contract pushes to the ERP system. Once you have set these and executed the contract, it is difficult to change afterwards.
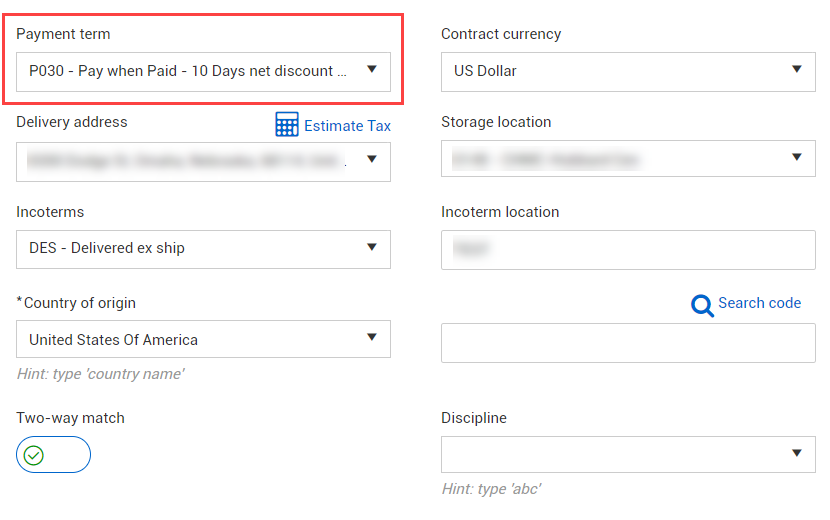
Only payment terms marked as Available in the Master data library are shown in the drop-down menu.
You will need to select the correct currency for payment to the vendor. This should be determined during contract negotiations and discussed with your business team to make sure you are able to pay the vendor with the agreed upon currency prior to contract execution. If a vendor has not been selected, the currency of the contract is used.
The delivery address will be set up during your project initiation. For instances where you want the material to be delivered to a yard or a storage facility, or a subcontractor to show up to perform work at an identified onsite location, you will have the option of picking that address.
The Estimate Tax calculator for this field lets you estimate the tax for the contract line items. Prior to publishing a contract, if you click Estimate tax, taxes are calculated based on the tax types and their default percent listed in project settings. The estimated taxes are shown in the contract's line items and the contract totals. When the contract is published, tax information is updated from the Purchase order response.
Incoterms indicate who is responsible for the material during shipment to the jobsite or the storage location. This will default into the Vendor Master Record as terms for the materials to be shipped.
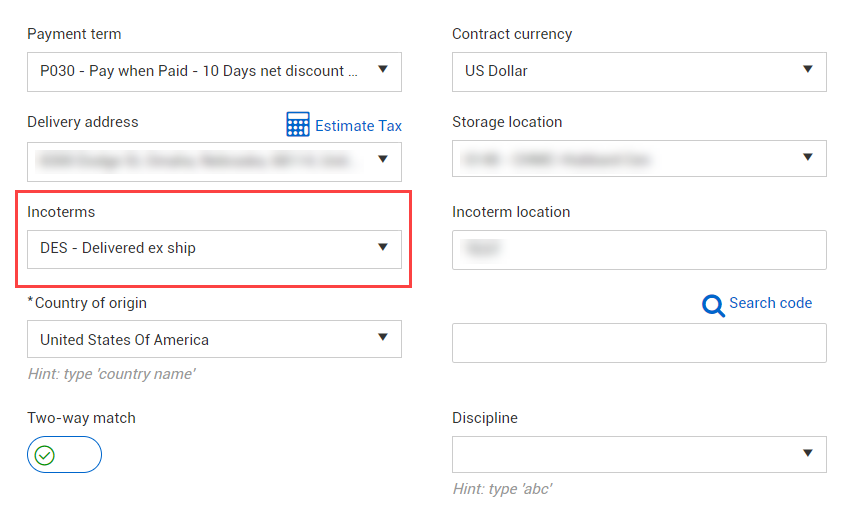
Only Incoterms marked as Available in the Master data library are shown in the drop-down menu.
A pull-down with a selection of countries where the project is located.
The two-way match function in the contract module allows you to set a predetermined plan to pay a vendor. This plan is paid against a set schedule, such as completion milestones or progress payments.
If Yes is selected, the ability to create goods receipts against the purchase order and denotes the goods receipt as not applicable for all line items is disabled. When the purchase order is published, the ERP system can be mapped to create an invoice plan.
If you do not know if your contract will have an invoice plan, the best practice is to leave the setting selected to No. Otherwise, if you select Yes and then determine that an invoice plan is not correct after the contract has been pushed to the ERP system, the ERP system does not allow you to make this correction; a new contract must be drafted.
Use the toggle to set Two-way match feature to Yes or No.
The discipline pull-down list will provide the type of discipline categories you can choose for your contract. The disciplines are pulled from the master data set up in InEight Platform.
Free text area where you can indicate the scope of your contract.

Additional Information
9977 N 90th Street, Suite 250 Scottsdale, AZ 85258 | 1-800-637-7496
© 2024 InEight, Inc. All Rights Reserved | Privacy Statement | Terms of Service | Cookie Policy | Do not sell/share my information